 Substrate Calculator
Hover your cursor over the numbers before each field for more information about that particular field.
|
||||||||||||||||||||||||||||||||||||||||||||||||||||||||||||||||||||||||||||||||||||||||||||||||||||||||||||||
<<< Back to index
>>> Contact form
This calculator was created to help cultivators calculate the proper amounts of substrate materials and water to create a substrate with a target MCMoisture content
This is the percentage of water in a substrate or material after accounting for any water current present within the materials. This tool may be more useful for those who are creating their own substrate recipes with raw, unprocessed materials.
If you notice any errors or have any comments or suggestions, please email me at edgarallanpoe1087@gmail.com, send me a PM on Shroomery (EdgarPoe), or use the contact form.
And please check my math at the bottom...
NOTE: The primary goal of this calculator is to create substrate recipes. While there is a section on lime pasteurization, the calculator will still work if you choose to exclude that section entirely. The lime pasteurization section is there simply to help those who like to treat their substrates with lime.
This page is best viewed and used on desktop. It has not been optimized or designed to be used on mobile devices yet.
UPDATE (26 March 2025): I now offer the calculator as a spreadsheet for you to download! If you'd like to keep a local version of the calculator without having to save this webpage, you can download the spreadsheet here!
Substrate CalculatorHover your cursor over the numbers before each field for more information about that particular field.
|
||||||||||||||||||||||||||||||||||||||||||||||||||||||||||||||||||||||||||||||||||||||||||||||||||||||||||||||
Calculator Instructions|
NOTES:
|
Calculator Components|
Table 1: SUB RATIO |
|
This table pertains to what percentages the water and ingredients will make up your substrate.
Make sure that the TOTAL (%) equals 100. If it is over 100, the field will turn red. You must adjust your ratios so that it equals 100. If you proceed to use the calculator with this number greater or lesser than 100, the recipe that is created will have a skewed water ratio. |
|
Table 2: SUB BREAKDOWN |
|
This table shows you the target weight of the water and each ingredient that your substrate will have.
|
|
Table 3: INGREDIENT MC PROFILES |
|
This table shows you a profile of the moisture content of each of your ingredients.
|
|
Table 4: WATER PROFILE |
|
This table shows you a breakdown of the water in your substrate.
|
|
Table 5: FINAL RECIPE |
|
This table shows you the final recipe for you to follow.
|
|
Table 6: LIME PASTEURIZATION |
|
This table shows you calculations for lime pasteuriation.
|
Example of Real World UseThe calculator works on a combination of simple equations pertaining to each ingredient. A check of the math will prove its efficacy, but its true value is proven in its real-world application. In this section, I will present a simple example of how the figures listed by the calculator are applied to create a substrate.
Storing your ingredientsTo reduce the amount of moisture absorbed by your ingredients from the surrounding environment, materials used for making substrates should be stored in containers that are as airtight as possible. Materials left out in the open air will inevitably absorb moisture from its surroundings, skewing your MC tests and making them unreliable. Keeping materials in closed containers will also help to reduce the number of MC tests you have to perform. Materials kept in a closed container for an extended period of time will balance out the moisture already contained within the container by passing it from wetter areas to drier areas, making your MC tests more reliable. For example, a pile of sawdust or bale of straw left outdoors where it will be exposed to the elements will see a dramatic rise and fall in moisture content due to rain, humidity, and drought. That same material stored in an airtight 5 gallon bucket will maintain a constant moiture content without any significant changes over a long period of time. |
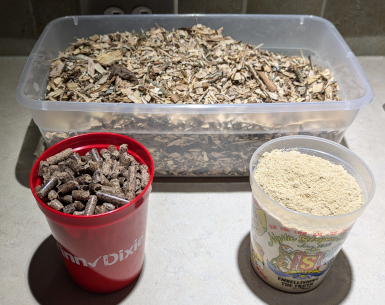
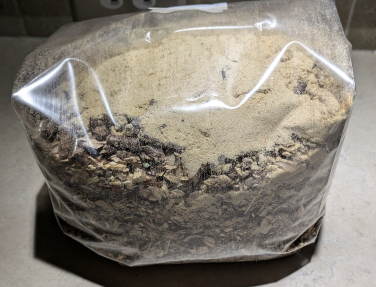
There will be three ingredients used in this example substrate, as shown in the photo above: wood chips (rear), HWFP (left), and rice bran (right).
I want to create a substrate with the following ratio and weights:
| % | g | |
| Total sub weight | --- | 3000g |
| Water | 60% | 1800g |
| Wood chips | 20% | 600g |
| HWFP | 15% | 450g |
| Rice bran | 5% | 150g |
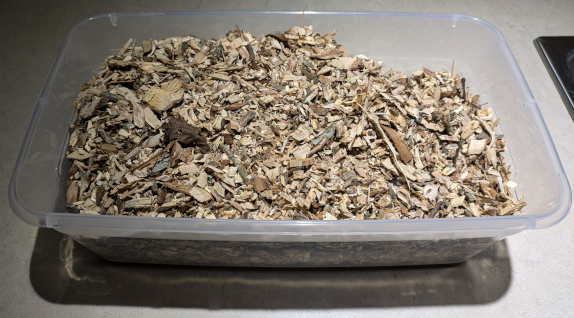
The wood chips used in this example come from my property. It is a mix of red oak, pecan, and a branch or two of chinaberry. The branches were stripped of any leaves and any twigs smaller than the thickness of my index finger before being fed through a cheap wood chipper. The chips were collected and laid out in the sun to dry for a few days, after which they were collected again and stored in a 5 gallon bucket for a week before use. This week-long "rest" is intended to help balance out any significant moisture differences in the bucket before performing an MC test. This is an important task when working with raw materials such as wood chips.
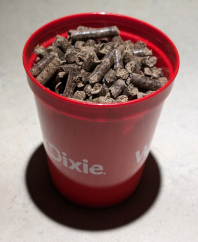
HWFP (hardwood fuel pellets) are a staple in wood-based substrates. Typically fuel pellets used for heating are used for substrates, but cooking pellets are just as good, albeit a bit more expensive. The pellets used in this example are made of oak, though the label doesn't specify the exact species. Be aware that many heating fuel pellets may contain or be primarily made of softwood such as pine or cypress. Some mushroom species can grow perfectly fine on this kind of wood, but other species have difficulty. When picking fuel pellets, look for those made from hardwoods. Usually I omit HWFP from MC tests as long as they are still stiff and offer a decent amount of resistance when attempting to break in half. This is a personal litmus test and not a definitive indicator of moisture content. On average, HWFP contain a moisture content of around 1-5%, which is enough water to throw your target moisture content off by a percentage or two. This is a perfectly reasonable margin of error, in my personal opinion. With that said, my decision to omit HWFP from MC tests is entirely personal.
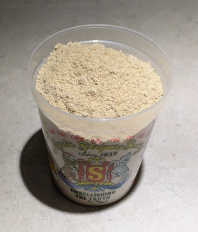
Rice bran (and other brans) are used as a nutritious additive to improve colonization, fruiting yeilds, and fruit quality. This is due to the increase of nitrogen and starch provided by the bran, which are essential for protein and energy production and many important mycelial cellular functions. There are many different types of supplements that can be added to substrates to provide a boost in overall nutrition, such as bran, manure, coffee grounds, and seed hulls. Grain can be used as a supplement as well, but it is more efficient to add grain only as colonized spawn. This will not only boost the nitrogen in the substrate, but it will also reduce the colonization time by providing the mycelium more "jumping off" points and reduce the risk of contamination. It's the epitome of killing two birds with one stone. The availability of supplements to you may be different than they are for me. Rice bran is the cheapest option available to me. An MC test should always be performed on bran of any kind. Even at such a small ratio (5% in this example), there may be enough water contained in it that it can cause the substrate to be too moist.
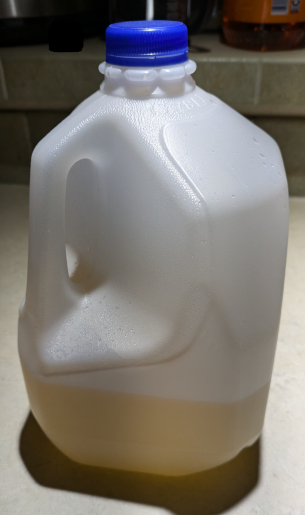
Water is perhaps the most important ingredient in a substrate. Too much or too little will become a primary factor in the substrate's failure. It is crucial that the appropriate amount of water is added. It is because of its importance in substrate composition that this calculator was created. Many people recommend using distilled water for substrates since it is pH neutral and free of any chemicals that may harm or stunt mycelium. The water used in this example is well water from my property. The water was tested some years ago, and I doubt the mineral profile has changed by much. There are trace amounts of calcium, potassium, and sulfur, all of which are trace minerals used by the mycelium. The pH of the water is also neutral. I also included about 10mL of oat soak water that was drained from some oats used in spawn production (this is the cause for the yellow color of the water). This is a personal choice that may or may not have any effect on the substrate's overall quality. I recognize it as a bias I have, as I'm sure the quality of my crops would not be negatively affected if I omitted this addition. It's like wearing your lucky Boston Red Sox jersey while watching the World Series. You feel like it helps.
The first task to be completed is performing MC tests on all ingredients. As stated above, the HWFP will be omitted from the test. Here are the results after testing the wood chips and rice bran:
| Dry weight needed (g) | MC (%) | MC (g) | Wet weight needed (g) | |
| Wood chips | 600g | 16% | 114.286g | 714.286g |
| Rice bran | 150g | 9% | 14.835g | 164.835g |
As expected, there was a high water content in the wood chips. Since there is 16g of water in every 100g of wood chips, 600g of chips would actually be 96g water and 504g wood. The target dry weight is 600g. If you weigh out 600g of these wood chips, you would be 96g short of your target. 96g of water is not an insignificant amount. This will significantly increase the moisture content of the entire substrate while reducing the overall weight of the dry ingredients. This is the primary reason MC tests are important. Once the MC% has been plugged into the calculator, it outputs the actual weight of the wood chips that you should weigh out so that you have 600g of wood. The remaining weight is water, which is deducted from the 1800g of water called for by the recipe.
After weighing out the ingredients, they are ready to be mixed together. The images in this section have already been weighed out for this substrate.
Ingredients added to filter bag
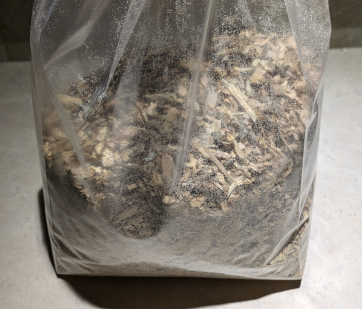
Ingredients shaken to mix
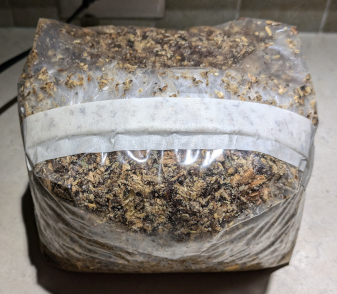
Water added and bag taped. Ready for sterilization
After the water has been added and mixed, the bag is folded and taped to protect the filter during sterilization. If using a pressure cooker to sterilize, you can keep the tape on the bag after sterilization until you're ready to spawn. If tyndallizing your substrate, remove the tape and unfold the bag after each steaming session before it cools as the adhesive will be soft while it's warm. This allows for proper gas exchange which is crucial for the tyndallization process.
Although lime pasteurization has a section on the calculator, I didn't include it in this example. This is because lime pasteurization would not be an effective treatment for this block. This is solely due to the addition of the rice bran. As mentioned above, the rice bran is very nutritious and attractive to contaminants and may harbor endospores that are resistant to pastuerization (both heat and chemical methods) as well as boiling water. The substrate would have to be sterilized by pressure and steam or tyndallized to destroy all living organisms and endospores.
And that's it. On paper, it seems a little complicated, but when put into practice, it's pretty straightforward and easy.
What Is a Substrate?|
If you are just beginning your cultivation journey or are interested in beginning, I recommend picking up Growing Gourmet and Medicinal Mushrooms by Paul Stamets. There is much more in-depth information about not only substrates, but the entire mushroom cultivation process. The information provided by it is worth its weight in gold. |
A substrate is the final stage of the mushroom cultivation process. It is composed of materials that mycelium draws its nutrients and energy from. It can be made of a single material, or a combination of materials to improve overall nutrient value and fruiting yields.
Examples of substrate materials:
Creating your own substrate recipes is a great way to experiment with your cultures to see what kinds of yields you can achieve. You can try out cheaper alternatives to certain ingredients, test different supplements, or test out a new material's yield potential.
There are several important factors that should be considered when creating a substrate. The following is not an exhaustive list of every single factor, but just five that I identify as the most critical:
In order to fruit, mushrooms need mass and energy. These are provided by the substrate. A substrate block needs to be a certain weight to be able to produce mushrooms. In the mushroom industry, cultivators evaluate the quality of their straings and yields using an equation called the biological efficiency, or BE. It is a ratio of the amount of fresh mushrooms harvested to the weight of the substrate's dry ingredients. In my opinion, there is a better metric by which we can evaluate efficiency (more on this in the biological efficiency section). The weight of substrate blocks have a direct correlation to the quantity and quality of your fruits.
For bags, I make blocks that are a minimum of 2.5kg, and for buckets I make them 4kg. Given the right ingredients, spawing ratio, and incubation conditions, these blocks will take most oyster species about a month to fully colonize.
A substrate made entirely of wood-based material is a suitable substrate for wood-loving species. There is not a lot of dense nutrients in a substrate with that composition, but with a high spawning ratio, the supplementation will come from the spawn itself. If you are looking to conserve spawn by adding as little as you can get away with to the substrate, you would do yourself a favor by adding a supplement. Many things can act as supplements, however not all mushrooms enjoy the same ones. Manure is great for agaricus species, but oysters would do better with an alternative, such as rice bran. One of my future experiments is seeing what kind of results I get from oyster mushrooms growing in different substrates by using some of the aged chicken manure from the floor of my chicken coop in different ratios.
The most commonly used supplements are found as horse feed, such as bran and whole grains. As mentioned above, grains are best added as spawn and not as a separate supplement. Another commonly used supplement is seed hulls. Soybean and cottonseed hulls are frequently used in master's mixes, a substrate recipe calling for 50:50 HWFP:seed hulls by weight. For many beginners, coffee grounds are an easily attainable supplement that are dense in nitrogen and other micronutrients. Coffee is very susceptible to contamination, so strict adherence to sterile technique is required.
No matter which way you approach supplementation additives, adding something to the substrate will improve your fruiting yields and fruit quality. However, nutritious substrates are not just attractive to mushroom mycelium. Other microorganisms will compete with your culture and potentially overtake it if the substrate wasn't sterilized correctly or an improper sterilization process was used. Substrates made without supplements can be sterilized, tyndallized, or pasteurized. Those made with supplements (such as the substrate made in the example above) must be sterilized or tyndallized.
The composition matrix is the density and physical makeup of the substrate, specifically the particle size of the ingredients. Substrates made entirely of powdered or granular materials will be difficult for the mycelium to colonize, even if it is nutritious and sterile. For most cultivated mushrooms, they enjoy a substrate made up of a mix of large and small particles. This allows oxygen to penetrate into the deeper parts of the substrate for the mycelium to breathe. Many species tolerate higher CO2 levels during their colonization stage, but they cannot do without oxygen entirely. Providing the oxygen through the matrix of the substrate is the easiest and most efficient way. As in the example above, the wood chips provide the larger air pockets for oxygen to penetrate than what would be provided by the HWFP and rice bran alone. It also prevents the substrate from becoming too compact.
This factor is something that has been discussed many times on this page so far, and for good reason. In my opinion, moisture content is something that can make or break a substrate regardless of ingredients or supplementation. A substrate that is too wet is a breeding ground for any bacteria that makes their way into your block, and one that is too dry will cause the mycelium to grow slowly and potentially stall. If you manage to get a dry substrate to colonize, it may not fruit, or primordia and pins may abort.
In general, pH is a measure of how acidic or basic a liquid solution is. It is the measure of the concentration of hydrogen ions in a liquid solution which corresponds to pH readings. The higher the concentration, the more acidic the solution is. Each mushroom species has its own preferred pH range, but many species enjoy a neutral pH around 7. However, many species are tolerant of higher-than-average pH levels, which is why lime pasteurization is effective. However, a pH that is too high will prevent the mycelium from accessing nutrients, essentially starving the mycelium and risking damage to the culture. For quicker colonization, the substrate's pH should be as close to neutral as possible.
Biological Efficiency vs. Productivity EfficiencyOne of the methods for determining the quality of a substrate is by figuring out the ratio of fresh mushrooms to dry ingredients. This is called the "biological efficiency", or BE. This metric is also used to evaluate culture quality and predicting yields. It is measured by the following equation:
BE = (W / D) x 100%
whereas
As you can see, it uses the weight of the dry ingredients. Using our example from above, the BE would not use the entire 3kg weight. That is the total weight of the substrate with the water added. The BE would use 1200g, which is the total weight of the dry ingredients:
BE states that if I were to harvest 1000g of fresh mushrooms through all flushes from our substrate, the BE would be 83.33%:
BE certainly has its place in mushroom cultivation. For our purposes, I find this metric to be lacking. That is why I favor a different metric that I've labeled the "productivity efficiency", or PE.
| Before I get into this, I want to state that this is my own personal opinion. I still keep track of the BE on my experimental grows in the case that I find value in that information at a later point in my journey. However at this point, I don't see why it should be the primary metric for determining a substrate's efficiency. BE is an excellent way of ensuring that you don't run out of substrate material, but judging a substrate's efficiency should be measured with a different metric. Of course, this favors one cultivator's personal preferences over something other cultivators have been doing since before I even started my own cultivation journey. I recognize this and acknowledge it fully. With that being said, let me explain why I believe the BE metric - as it is - is the wrong metric to use here. |
The BE equation does not take the water content into consideration. It only uses the sum of the dry ingredients. This is perfect if you are checking your stock of substrate ingredients. If you know you can harvest 40kg of fresh mushrooms from 40kg substrate, you know what kind of yields to expect before you even purchase ingredients. However, I find this to be of little value to judge a substrate's efficiency as fresh mushrooms are around 90% water by weight. Dry substrate ingredients can't produce mushrooms on their own and will need water in order for the mushroom to convert some of that dry material into mushrooms.
Another reason why I personally believe the BE metric should not be the primary metric used for substrate efficiency is because of the values that you can end up with. It is fairly common to see a BE of over 100% using the dry weight only. That does little to tell me anything about the substrate. However, using the total substrate weight will always produce a value less than 100% and is easier to visualize to determine efficiency.
I would propose to change the metric from "biological efficiency" to "productivity efficiency", and I would change the equation to something like this:
whereas
Here's the example from above. Let's say I was able to harvest 1000g of fresh mushrooms from our 3kg substrate:
One thing that I haven't covered that should be taken into account is the weight of the spawn that you will be inoculating the substrate with. I have a particularly high spawning ratio and will add a range of 250-400g of colonized oats to a 3-4kg substrate. That added mass has to added to the weight of the substrate for the most reliable data. For the sake of simplicity, we will assume that the total weight of the substrate after inoculation is 3kg.
The result from the PE equation is a much smaller number than BE, but it's much easier to visualize and grasp. Essentially this number tells me that out of the 3kg, 33.33% of it was converted into fresh mushrooms. That would mean that after the last flush has been harvested, the substrate should weigh approximately 2kg, around a third lighter than when it began. Of course there may be some discrepancies with the weight due simply to the fact that the mycelium and substrate will draw moisture from the humidity of the fruiting environment or any misting or soaking that you may do to it. The "fact" of the matter still stands: PE is a better respresentation of overall substrate efficiency than BE.
MC TestIn order to achieve the target MC for your substrate, you must take the water currently present in your ingredients into account. Just because a material feels dry to the touch doesn't mean that there isn't water residing in it. Assuming that all of your materials begin with 0% MC can possibly lead to a substrate well over the margin of error for moisture content, making the substrate too wet for mycelium to grow. Using the wood chips from the example above, the wood chips were 16% water. Assuming that they contain no water would cause the moisture content to increase and the amount of dry matter to decrease. This would have significant effects on the quality of the substrate and colonization by the mycelium. This is why performing an MC test is important.
To perform an MC test on a material, follow these steps:
|
Once you've finished your test, subtract your final weight from the starting weight (100g). The difference is the MC% of your material. Using the wood chips from above, here are the results from its MC test:
| Wood chips | |
| Starting weight | 100g |
| Weigh 1 | 93g |
| Weigh 2 | 86g |
| Weigh 3 | 84g |
| Weigh 4 | 84g |
Subtracting the final weight from the starting weight gives us the MC%:
As you can see, it took a while to complete this test. If the moisture content had been higher for this sample, the MC test would have taken longer to complete. The higher the moisture content, the longer the test will take.
FC TestFC stands for "field capacity". In general, it is the measure of moisture that can be held within a material without draining. An FC test is a method for determining the approximate moisture content of a substrate that has been mixed and wet. It is a less precise test used on substrates that have already been mixed together. You could also do an FC test on your individual ingredients separately, but the test is more accurate after the ingredients have been mixed together. This is so that one ingredient's low moisture content won't affect another's higher content.
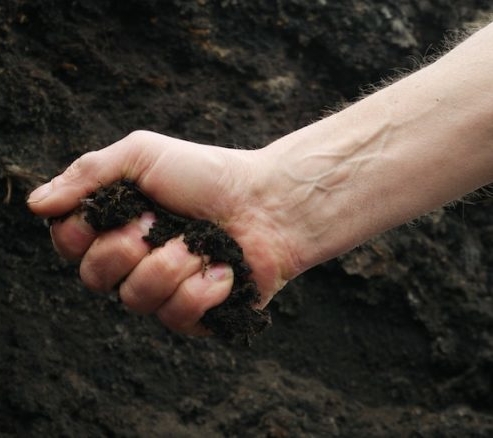
To perform an FC test, squeeze a handful of mixed and wetted substrate. The water that is squeezed out of the sample will tell you whether your substrate is too wet, too dry, or just right. If a stream of water pours out of the sample, the substrate is too wet. If nothing drips out of it, it's too dry. If just a few drops fall out, then it's just right. This will not tell you exactly how much water is in the substrate, but it will provide you with a reasonable range of moisture content. A squeezed sample that only lets out a few drops may be in the 50-70% MC range. This is not always the case as determining the MC% via an FC test is dependent on different factors, such as the type of material and squeeze strength. I've mentioned a "margin of error" a few times so far. The margin of error is the range of a "just right" amount of water when squeezed. Think of this range as more of a gradient rather than definitive thresholds.
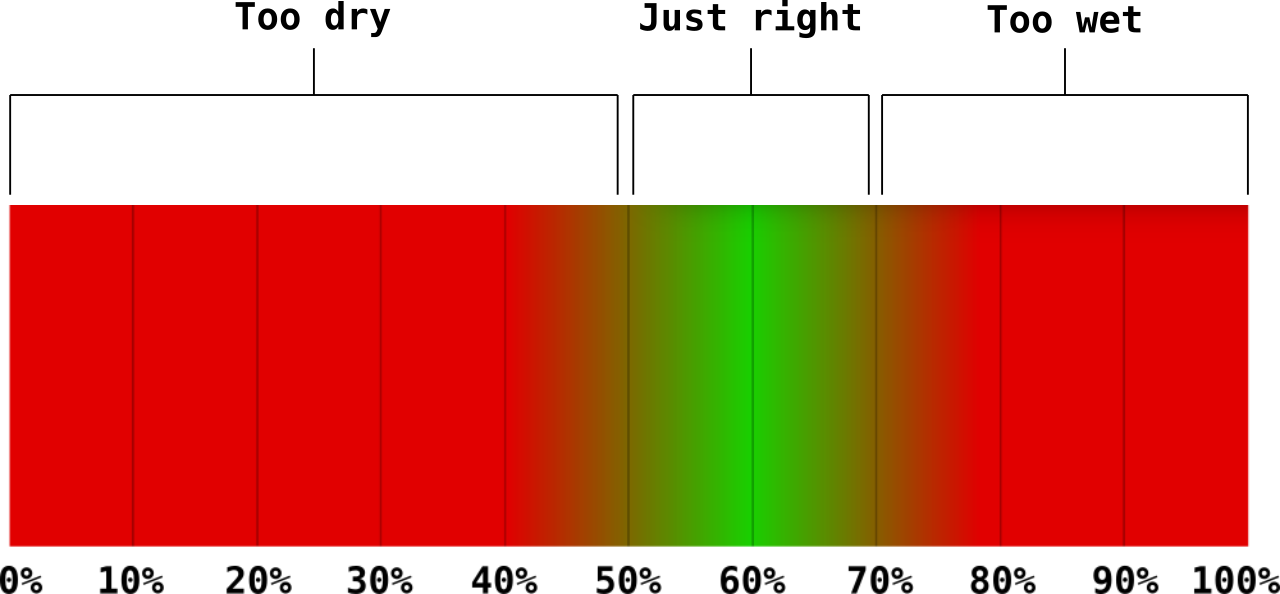
This chart is only an example. Each specie will have its own preferred MC%.
As you're working with the substrate calculator, you should take the opportunity to become familiar with the visual and tactile cues of a properly hydrated substrate made with your specific ingredients. This will help you create substrates quicker. Once you become familiar with your ingredients, you will be able to mix and hydrate mass amounts of substrate with just a quick look and squeeze. You will not have a need for this calculator once you've mastered the FC test. However, if you are going for precision, the calulator will be a valuable tool.
Lime PasteurizationAll substrates have to be treated in a way that will reduce the risk of contamination and increase the probability of full colonization by the mushroom culture. This can be affected through either a physical or chemical method. There are several different ways to treat substrates to achieve this goal:
|
Lime is a term referring to the inorganic products created from the processing of naturally occurring limestone. Limestone is a type of sedimentary rock rich in calcium carbonate, magnesium carbonate, and/or dolomite that is formed when dissolved calcium minerals precipitate out of water and become cemented over time. To create lime, limestone is collected, crushed, seived, washed, and fired in a kiln at temperatures over 1650F/900C. This converts the stone into quicklime, or calcium oxide. It is then crushed into a fine powder and water added to it to create hydrated lime, or calcium hydroxide. It is a highly alkai product that has many applications in various industries including construction, agriculure, and sanitation. For our purpose, we want to use its alkali property the raise the pH of our substrates.
There are many different types of lime available for many different industries. What makes it even more complicated is that different manufacturers may refer to the same product by different names. Below is a list of different common types of lime, their compositions, and their primary uses:
| LIME TYPES | ||
| Lime | Composition | Uses |
| Quicklime | CaO, calcium oxide |
|
| Hydrated lime
Slacked lime Pickling lime Builder's lime |
Ca(OH)2, calcium hydroxide |
|
| Agricultural lime
Garden lime |
CaCO3, calcium carbonate |
|
| Dolomite lime | CaMg(CO3)2, calcium magnesium carbonate |
|
The type of lime used for substrate pasteurization is hydrated lime that is high in calcium (in the form of calcium hydroxide) and low in magnesium. Lime that has a high magnesium level is unsuitable for mushroom cultivation. High magnesium levels in the substrate will prevent mushroom mycelium from growing. The magnesium content should never be higher than 5%. Of course, not all hydrated lime products are the same. Some products are labeled as hydrated lime, but the compositions may contain more than just calcium hydroxide. When choosing lime, always refer to the label. Reputable brands will list the lime's composition right on the bag. If it's not on the bag, check online for an MSDS sheet for the product.
Here are a few examples of hydrated lime products and their compositions from either their labels or MSDS:
Apologies for the low quality images. Here is the information showing what is listed on the labels:
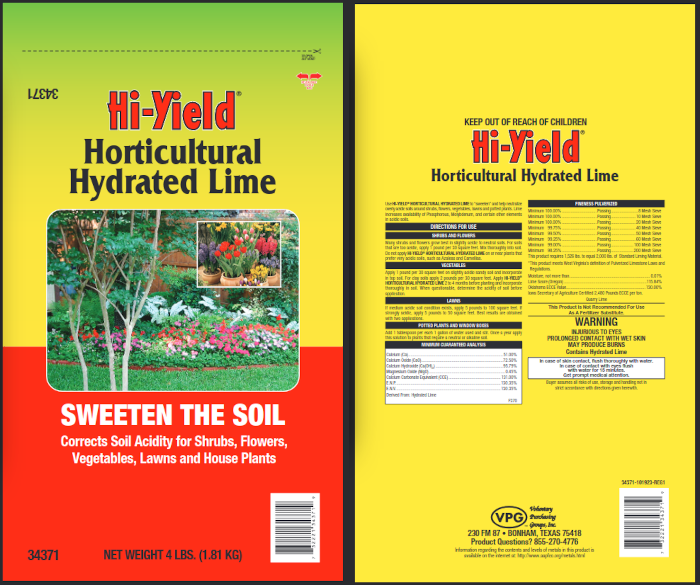
| HI-YIELD HORTICULTURAL HYDRATED LIME | |
| Component | Ratio |
| Calcium (Ca) | 51.00% |
| Calcium oxide (CaO) | 72.50% |
| Calcium hydroxide (Ca(OH)2) | 95.79% |
| Magnesium oxide (MgO) | 0.45% |
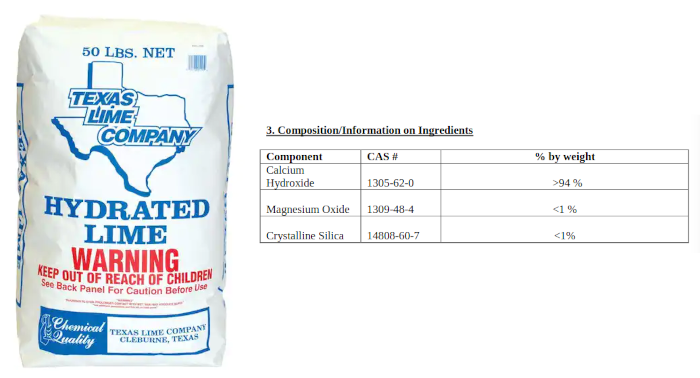
| TEXAS LIME COMPANY HYDRATED LIME | |
| Component | Ratio |
| Calcium hydroxide | >94% |
| Magnesium oxide | <1% |
| Crystalline silica | <1% |
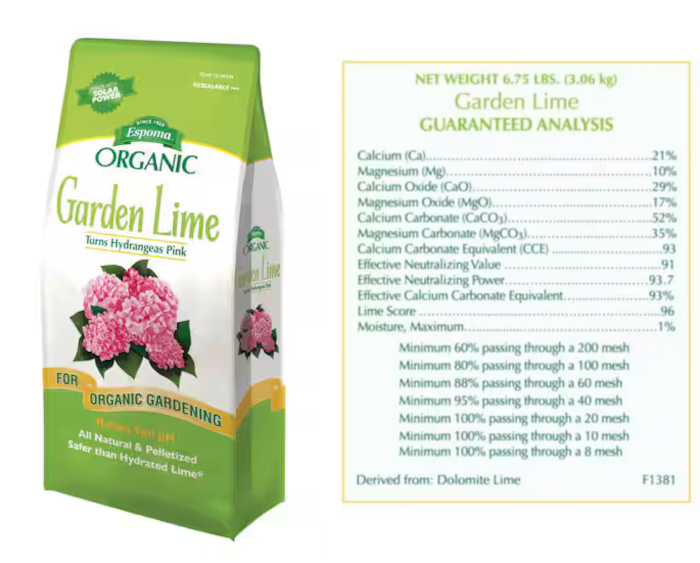
| ESPOMA ORGANIC GARDEN LIME | |
| Component | Ratio |
| Calcium (Ca) | 21% |
| Magnesium (Mg) | 10% |
| Calcium oxide (CaO) | 29% |
| Magnesium oxide (MgO) | 17% |
| Calcium carbonate (CaCO3) | 52% |
| Magnesium carbonate (MgCO3) | 35% |
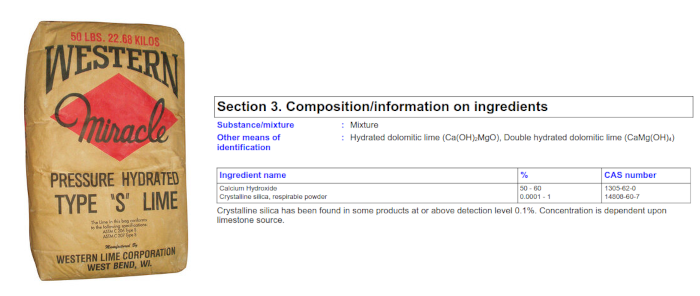
| WESTERN MIRACLE PRESSURE HYDRATED TYPE S LIME | |
| Component | Ratio |
| Calcium hydroxide | 50-60% |
| Crystalline silica | 0.0001-1% |
As you can see, the composition of each product differs although they each carry the name "hydrated lime" (with the exception of the garden lime, which was only included for demonstration purposes). This is why it's important to check the labels or MSDS for the products you're interested in.
Out of the four examples above, the best choices would be the Hi-Yield Horticultural Hydrated Lime and the Texas Lime Company Hydrated Lime. According to their labels, their magnesium contents are both under 1% of the total composition. This is well below the 5% threshold that make those products suitable for lime pasteurization. Looking at the label for the Espoma Organic Garden Lime, you can see that the magnesium content is twice the acceptable magnesium threshold. Not only than, the lime content does not come from calcium hydroxide. Instead, it's derived from calcium carbonate. The calcium oxide ratio is fairly high as well, but the calcium carbonate is primarily responsible for its alkali properties. Even if the magnesium content was well below 5%, it would still be a less acceptable product to use given that the pH for calcium carbonate can only reach 9.4 when fully saturated. For proper lime pasteurization, a minimum of pH 10 should be reached. For the Western Miracle Pressure Hydrated Type S Lime, there is no label on the packaging. A quick look at the MSDS tells us everything we need to know about its composition. According to the table, it shows calcium hydroxide making up 50-60% of the product, but just above the table, it lists its "other means of identification" as "hydrated dolomitic lime" and "double hydrated dolomitic lime". A prime example as to why you should check the labels. Dolomite (or dolomitic lime in this case) is not proper for lime pasteurization due to the high magnesium content.
If you are interested in lime pasteurization, do the research so you don't end up with the wrong type of lime.
As mentioned, lime raises the pH of the substrates. This sudden change in pH will destroy some colonies of contaminants while forcing others to go dormant. This gives the mushroom an advantage given their more tolerant nature of high pH levels.
To prepare for lime pasteurization, measure out enough water to completely submerge your substrate. Meaure out the appropriate amount of lime and add to the water. Do not heat the water. Stir the water long enough for the powder to dissolve. Once it has, submerge the substrate in the lime water with something placed on top to keep it below the water line. This can be done with a brick or cinder block. Keep the substrate submerged for at least a couple hours. It won't hurt the substrate if it's left unattended for longer. After it has soaked, pull the substrate from the water and allow it to drain completely. Mix the materials and perform an FC test periodically to gauge the moisture content. If you are unsure whether you're gauging the moisture correctly, you can take a 100g sample from the substrate and perform an MC test. This is much more reliable than the FC test, although it does take much longer to perform.
This is a tricky question due to the issue that was discussed earlier: although different brands may use the term "hydrated lime", the composition is often not pure calcium hydroxide. This will affect the solubility and maximum pH that can be achieved. In general, calcium hydroxide is only slightly solubile in pure water at ~1.6g/L at 20C. It's solubility is affected by temperature with it becoming less soluble in pure water as the temperature rises. At 100C, its solubility is 0.66g/L and increases to 1.89g/L at 0C. This is why the lime water should not be heated. Another factor that can affect the pH is the fact that calcium hydroxide can easily react with carbon dioxide from the air, splitting the calcium hydroxide molecule into calcium carbonate and water. As mentioned, calcium carbonate does not raise the pH level high enough for proper lime pasteurization.
When fully saturated, calcium hydroxide can only reach a pH of 12.4. This makes it a very reliable pH indicator. However, as stated in the paragraph above, sometimes the products can be mixed with other chemicals that can affect the pH. One way to determine the "power" of your lime is to perform a pH test. This can be done by measuring out a liter of room temperature water (preferrably distilled water) and adding small increments of lime to it, measuring the pH of the water before adding more lime. You can measure the pH with a digital pH meter or pH strips.
For more information on calcium hydroxide, visit the PubChem site.
MathAs if there hasn't already been enough math explained throughout this page, this section shows how the calculator works. I've written out the equations that provide the information in each field. This took a bit of thinking outside the box to get the correct equations, but it was a fun thought experiment that I believe can provide great value to those cultivators who - like me - like to experiment with different types of substrate materials, or for those who want to use raw materials with varing degrees of moisture content.
If you happen to find any errors or miscalculations, please do not hesistate to contact me. I followed no road map to come up with these equations. They were all created myself through a lot of trial and error, so I do not claim them to be entirely correct. I only assume that they are based on checks, but of course, those checks were also done myself. Maybe even the checks are wrong. But if you are so inclined, I would greatly appreciate an independent check of my math to ensure that the calculator is accurate and reliable. Thank you in advance.NOTE: The superscripts and subscripts are not exponents. They are variable identifiers.
The short equations are the simplest I can make the math associated with that field. The long equations are the expanded versions of the short versions only using variables that require user input. The simplified equations are the simplest forms of the long equations that could be made.
| CALCULATOR FORMULAS | |||||
| Table | Variable | Name | Short equation | Long equation | Simplified equation |
| SUB RATIO | a1 | Water (%) | [user input] | [user input] | |
| b1 | Ingredient 1 (%) | [user input] | [user input] | ||
| c1 | Ingredient 2 (%) | [user input] | [user input] | ||
| d1 | Ingredient 3 (%) | [user input] | [user input] | ||
| e1 | Ingredient 4 (%) | [user input] | [user input] | ||
| f1 | Ingredient 5 (%) | [user input] | [user input] | ||
| g1 | Ingredient 6 (%) | [user input] | [user input] | ||
| h1 | TOTAL (%) | h1 = a1 + b1 + c1 + d1 + e1 + f1 + g1 | h1 = a1 + b1 + c1 + d1 + e1 + f1 + g1 | ||
| SUB BREAKDOWN | i1 | Total sub weight (g) | [user input] | [user input] | |
| j1 | Water (g) | j1 = (i1 * a1) / 100 | j1 = (i1 * a1) / 100 | ||
| k1 | Ingredient 1 (g) | k1 = (i1 * b1) / 100 | k1 = (i1 * b1) / 100 | ||
| l1 | Ingredient 2 (g) | l1 = (i1 * c1) / 100 | l1 = (i1 * c1) / 100 | ||
| m1 | Ingredient 3 (g) | m1 = (i1 * d1) / 100 | m1 = (i1 * d1) / 100 | ||
| n1 | Ingredient 4 (g) | n1 = (i1 * e1) / 100 | n1 = (i1 * e1) / 100 | ||
| o1 | Ingredient 5 (g) | o1 = (i1 * f1) / 100 | o1 = (i1 * f1) / 100 | ||
| p1 | Ingredient 6 (g) | p1 = (i1 * g1) / 100 | p1 = (i1 * g1) / 100 | ||
| INGREDIENT MC PROFILES |
q1 | Ingredient 1 > Dry weight (g) | q1 = k1 | q1 = (i1 * b1) / 100 | |
| r1 | Ingredient 1 > MC (%) | [user input] | [user input] | ||
| s1 | Ingredient 1 > MC (g) | s1 = t1 - q1 | s1 = (((i1 * b1) / 100) / ((100 - r1) * 0.01)) - ((i1 * b1) / 100) | \( s_1 = \frac{i_1 \cdot b_1 \cdot r_1}{100 \cdot (100 - r_1)} \) | |
| t1 | Ingredient 1 > Wet weight (g) | t1 = q1 / ((100 - r1) * 0.01) | t1 = ((i1 * b1) / 100) / ((100 - r1) * 0.01) | \( t_1 = \frac{i_1 \cdot b_1}{100 - r_1} \) | |
| u1 | Ingredient 2 > Dry weight (g) | u1 = l1 | u1 = (i1 * c1) / 100 | ||
| v1 | Ingredient 2 > MC (%) | [user input] | [user input] | ||
| w1 | Ingredient 2 > MC (g) | w1 = x1 - u1 | w1 = (((i1 * c1) / 100) / ((100 - v1) * 0.01)) - ((i1 * c1) / 100) | \( w_1 = \frac{i_1 \cdot c_1 \cdot v_1}{100 \cdot (100 - v_1)} \) | |
| x1 | Ingredient 2 > Wet weight (g) | x1 = u1 / ((100 - v1) * 0.01) | x1 = ((i1 * c1) / 100) / ((100 - v1) * 0.01) | \( x_1 = \frac{i_1 \cdot c_1}{100 - v_1} \) | |
| q2 | Ingredient 3 > Dry weight (g) | q2 = m1 | q2 = (i1 * d1) / 100 | ||
| r2 | Ingredient 3 > MC (%) | [user input] | [user input] | ||
| s2 | Ingredient 3 > MC (g) | s2 = t2 - q2 | s2 = (((i1 * d1) / 100) / ((100 - r2) * 0.01)) - ((i1 * d1) / 100) | \( s_2 = \frac{i_1 \cdot d_1 \cdot r_2}{100 \cdot (100 - r_2)} \) | |
| t2 | Ingredient 3 > Wet weight (g) | t2 = q2 / ((100 - r2) * 0.01) | t2 = ((i1 * d1) / 100) / ((100 - r2) * 0.01) | \( t_2 = \frac{i_1 \cdot d_1}{100 - r_2} \) | |
| u2 | Ingredient 4 > Dry weight (g) | u2 = n1 | u2 = (i1 * e1) / 100 | ||
| v2 | Ingredient 4 > MC (%) | [user input] | [user input] | ||
| w2 | Ingredient 4 > MC (g) | w2 = x2 - u2 | w2 = (((i1 * e1) / 100) / ((100 - v2) * 0.01)) - ((i1 * e1) / 100) | \( w_2 = \frac{i_1 \cdot e_1 \cdot v_2}{100 \cdot (100 - v_2)} \) | |
| x2 | Ingredient 4 > Wet weight (g) | x2 = u2 / ((100 - v2) * 0.01) | x2 = ((i1 * e1) / 100) / ((100 - v2) * 0.01) | \( x_2 = \frac{i_1 \cdot e_1}{100 - v_2} \) | |
| q3 | Ingredient 5 > Dry weight (g) | q3 = o1 | q3 = (i1 * f1) / 100 | ||
| r3 | Ingredient 5 > MC (%) | [user input] | [user input] | ||
| s3 | Ingredient 5 > MC (g) | s3 = t3 - q3 | s3 = (((i1 * f1) / 100) / ((100 - r3) * 0.01)) - ((i1 * f1) / 100) | \( s_3 = \frac{i_1 \cdot f_1 \cdot r_3}{100 \cdot (100 - r_3)} \) | |
| t3 | Ingredient 5 > Wet weight (g) | t3 = q3 / ((100 - r3) * 0.01) | t3 = ((i1 * f1) / 100) / ((100 - r3) * 0.01) | \( t_3 = \frac{i_1 \cdot f_1}{100 - r_3} \) | |
| u3 | Ingredient 6 > Dry weight (g) | u3 = p1 | u3 = (i1 * g1) / 100 | ||
| v3 | Ingredient 6 > MC (%) | [user input] | [user input] | ||
| w3 | Ingredient 6 > MC (g) | w3 = x3 - u3 | w3 = (((i1 * g1) / 100) / ((100 - v3) * 0.01)) - ((i1 * g1) / 100) | \( w_3 = \frac{i_1 \cdot g_1 \cdot v_3}{100 \cdot (100 - v_3)} \) | |
| x3 | Ingredient 6 > Wet weight (g) | x3 = u3 / ((100 - v3) * 0.01) | x3 = ((i1 * g1) / 100) / ((100 - v3) * 0.01) | \( x_3 = \frac{i_1 \cdot g_1}{100 - v_3} \) | |
| WATER PROFILE | a2 | Total water needed (g) | a2 = j1 | a2 = (i1 * a1) / 100 | |
| b2 | Water in ingredients (g) | b2 = s1 + w1 + s2 + w2 + s3 + w3 | ((((i1 * b1) / 100) / ((100 - r1) * 0.01)) - ((i1 * b1) / 100)) + ((((i1 * c1) / 100) / ((100 - v1) * 0.01)) - ((i1 * c1) / 100)) + ((((i1 * d1) / 100) / ((100 - r2) * 0.01)) - ((i1 * d1) / 100)) + ((((i1 * e1) / 100) / ((100 - v2) * 0.01)) - ((i1 * e1) / 100)) + ((((i1 * f1) / 100) / ((100 - r3) * 0.01)) - ((i1 * f1) / 100)) + ((((i1 * g1) / 100) / ((100 - v3) * 0.01)) - ((i1 * g1) / 100)) | \( b_2 = \sum_{(x, y) \in \{(b_1, r_1), (c_1, v_1), (d_1, r_2), (e_1, v_2), (f_1, r_3), (g_1, v_3)\}} \frac{i_1 \cdot x \cdot y}{100 \cdot (100 - y)} \) | |
| c2 | Actual water needed (g) | c2 = a2 - b2 | c2 = (i1 * a1 / 100) - (((((i1 * b1) / 100) / ((100 - r1) * 0.01)) - ((i1 * b1) / 100)) + ((((i1 * c1) / 100) / ((100 - v1) * 0.01)) - ((i1 * c1) / 100)) + ((((i1 * d1) / 100) / ((100 - r2) * 0.01)) - ((i1 * d1) / 100)) + ((((i1 * e1) / 100) / ((100 - v2) * 0.01)) - ((i1 * e1) / 100)) + ((((i1 * f1) / 100) / ((100 - r3) * 0.01)) - ((i1 * f1) / 100)) + ((((i1 * g1) / 100) / ((100 - v3) * 0.01)) - ((i1 * g1) / 100))) | \( c_2 = \frac{i_1 \cdot a_1}{100} - \sum_{(x, y) \in \{(b_1, r_1), (c_1, v_1), (d_1, r_2), (e_1, v_2), (f_1, r_3), (g_1, v_3)\}} \frac{i_1 \cdot x \cdot y}{100 \cdot (100 - y)} \) | |
| FINAL RECIPE | d2 | Total sub weight (g) | d2 = i1 | d2 = i1 | |
| e2 | Water (g) | e2 = c2 | e2 = (i1 * a1 / 100) - (((((i1 * b1) / 100) / ((100 - r1) * 0.01)) - ((i1 * b1) / 100)) + ((((i1 * c1) / 100) / ((100 - v1) * 0.01)) - ((i1 * c1) / 100)) + ((((i1 * d1) / 100) / ((100 - r2) * 0.01)) - ((i1 * d1) / 100)) + ((((i1 * e1) / 100) / ((100 - v2) * 0.01)) - ((i1 * e1) / 100)) + ((((i1 * f1) / 100) / ((100 - r3) * 0.01)) - ((i1 * f1) / 100)) + ((((i1 * g1) / 100) / ((100 - v3) * 0.01)) - ((i1 * g1) / 100))) | \( e_2 = \frac{i_1 \cdot a_1}{100} - \sum_{(x, y) \in \{(b_1, r_1), (c_1, v_1), (d_1, r_2), (e_1, v_2), (f_1, r_3), (g_1, v_3)\}} \frac{i_1 \cdot x \cdot y}{100 \cdot (100 - y)} \) | |
| f2 | Ingredient 1 (g) | f2 = t1 | f2 = ((i1 * b1) / 100) / ((100 - r1) * 0.01) | \( f_2 = \frac{i_1 \cdot b_1}{100 - r_1} \) | |
| g2 | Ingredient 2 (g) | g2 = x1 | g2 = ((i1 * c1) / 100) / ((100 - v1) * 0.01) | \( g_2 = \frac{i_1 \cdot c_1}{100 - v_1} \) | |
| h2 | Ingredient 3 (g) | h2 = t2 | h2 = ((i1 * d1) / 100) / ((100 - r2) * 0.01) | \( h_2 = \frac{i_1 \cdot d_1}{100 - r_2} \) | |
| i2 | Ingredient 4 (g) | i2 = x2 | i2 = ((i1 * e1) / 100) / ((100 - v2) * 0.01) | \( i_2 = \frac{i_1 \cdot e_1}{100 - v_2} \) | |
| j2 | Ingredient 5 (g) | j2 = t3 | j2 = ((i1 * f1) / 100) / ((100 - r3) * 0.01) | \( j_2 = \frac{i_1 \cdot f_1}{100 - r_3} \) | |
| k2 | Ingredient 6 (g) | k2 = x3 | k2 = ((i1 * g1) / 100) / ((100 - v3) * 0.01) | \( k_2 = \frac{i_1 \cdot g_1}{100 - v_3} \) | |
Site History & Future Plans
This tool has been released under a CC-BY-NC-SA license. You are free to copy, modify, and distribute this tool so long as you offer the modifications under the same license and provide attribution to the creator. Distribution for commercial profit is prohibited.